
This isn’t filter2.0 or filter3.0, but rather an approach to make actual filter coffee with sufficient yield at coarse grind settings in a regular size espresso basket. With that out of the way, let’s explore why it may have taken so long to achieve this.
9 bar or bust
When most people think of espresso, the first phenomenon that one usually associates it with is pressure. While I’m less familiar with why 9 bar became a gold standard in espresso, what’s more interesting to me is that the discussion has rarely, if ever, been about a critical component that contributes to pressure – flow. Some would even go as far as to say, what is pressure but flow itself. While this is good way to normalize the idea of flow and make it a more talked about phenomenon, I think a more accurate way of looking at this is thinking of pressure, flow and puck resistance (which in turn is dependent on grind distribution), as a trifecta that coexist.
To understand why making traditional percolation brews (for the purpose of this post I will refer to it loosely as filter coffee) is challenging on an espresso machine, one needs to merely start a shot on any espresso machine without a portafilter and measure the rate at which water is flowing out. And then compare that to the rate at which water drips out of a bed of coffee when making filter brews. In absence of any form of flow control on an espresso machine, you’ll notice that without a puck with high resistance to restrict the flow of water, it flows out much faster than is needed for filter brews.
What’s your contact
The question then arises – why would one need flow to be this slow for filter brews? And soon you’ll realize why most attempts at making anything even remotely close to filter coffee using an espresso machine effectively involved grinding much finer than you would for filter coffee. While this in itself isn’t a problem (I’ll be posting soon about how to make delicious versions of such drinks), to my palate, for all intents and purposes, it doesn’t taste like a drink I get by passing water through a coarsely ground bed of coffee. And therein lies the problem – if in absence of any resistance water can’t flow any slower, and grinding coarse effectively means no resistance, that bed of coffee will barely yield anything.
There is something to be said about the importance of contact time. While segments of the enthusiast community has learned to let go of time as an important variable (h/t “time is the enemy” – EAF), I’ve noticed that “time in a range” can be a useful proxy for contact time. Every combination of nominal grind peak and associated boulder distribution seems to need a certain amount of contact time to allow for compounds to diffuse into water, and not all compouds diffuse with the same efficiency. This combined with the fact that every coffee bed is just that little bit different, you can see why targeting a time range can be useful. Mat North, who as usual tends to be a little ahead of his time, rightfully corrected me on Jonathan Gagne’s telegram channel when I overconfidently claimed that time is of no importance.
This also makes me appreciate approaches like filter2.0, where fine grind, long blooms and dilution were used to render a filter-like brew. But in my experience, filter2.0 consistently lacked the flavor separation I would get from my coarse grind V60 brews, and I wanted to bridge the gap in a way so that the result sat closer to a V60. So how do I make water flow slower through a puck without grinding finer? What if I were to instead drip water onto a puck at the same rate that it drips out of a bed of coffee bed when making filter?
Dripping water slowly onto a puck also makes fines migration less of an issue. This is not to say that fines migration won’t happen (it always happens), but rather the myriad of ways in which one needs to address how water flows through a bed of coffee and filter paper in a dripper in a situation where water comes out the kettle signficantly faster than it comes out the coffee bed, and in turn how one influences fines migration to influence desired drip rate out the bed of coffee, cease to be considerations.
All of a sudden, you see why this takes machines without any form of flow control out of contention. This will also remain my biggest disappoitment about my approach – I cannot say that this approach can be universally ported to all espresso machines. But I won’t be too disappointed. After all, if machines costing tens of thousands of dollars don’t have fine grain flow control, should we really be paying as much for such machines? Not to digress, but if a machine like Gaggia Classic Pro can be modified to have flow control …
More than a decent machine
I feel bad for both Ray Heasman (inventor of DE1) and Ben Champion (co-designer and water dispersion guru) because they’ve created and enabled a machine which users like me use to make not just great espresso, but good coffee at varying levels of tds. Before we get into the nitty gritty of why I’ve designed the profile the way I have, and why it behaves the way it does, it’s important to establish that the mechanics of DE1, despite all the weird stuff we use it for, was designed to primarily be an espresso machine. What this means is that everything from the rates at which water flows through the machine efficiently, the temperature ranges in which it does so and the dispersion patterns that are in place, are to enable water to flow through a resitive bed of coffee at sustained temperatures of low-90’s °C with a shot lasting anywhere between 10-60 seconds to yield anywhere between 20-60 grams of coffee at anywhere upto 12 bar of pressure. While most espresso arguably targets more stringent criteria, this flexibility allows for exploration of a wider range of espresso-style drinks. No one told Ray and Ben that some would use this machine to make filter coffee.
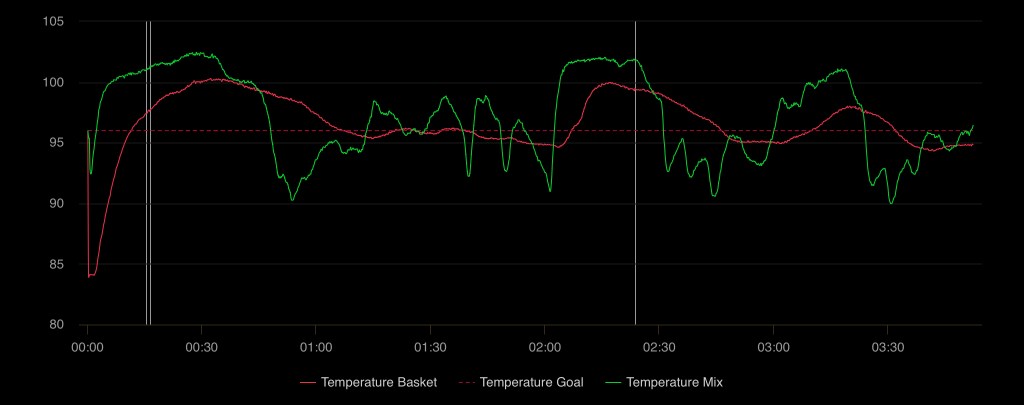
Because things get weird, even by DE1 standards. The first thing I noticed when trying to brew filter coffee at 600 microns from chirp was that extraction yield (EY) in such a setup had massive dependence on temperature. This goes against recent findings by Lance Hedrick that similar yields can be achieved at both low and high temperatures, but one must also consider the fact that a kettle stream cools down significantly by the time it hits the coffee bed. So a kettle stream exiting at 99°C can drop to 90°C by the time extraction begins, and I wonder if it’s possible that EY (not taste) is less affected when going from 90°C to 80°C, than going from 98°C to 93°C. In a DE1, if the temperature probe sitting a few millimeters away from the puck top reads 98°C, there’s a good chance the water is close to or at that temperature when extraction begins. Sustaining a temperature of 98°C can get tricky though. To ensure that water is at 98°C when it reaches the puck after having lost some heat along the way traveling from the mixing manifold, through the brass grouphead manifold, to the teflon dispersion block where the probe sits right behind the shower screen, the water needs to be hotter than 98°C when exiting the mixing manifold. This higher temperature can easily be above 100°C, and in the absence of pressure (and this is key), is essentially steam. As a result, while you do see super hot water come out the dispersion block, you also see steam beginning to form droplets at the dispersion block exit holes. Ray and Ben would probably shake their heads and go “this isn’t what we designed this for”. Check out the video shorts below showing the difference between 1 mlps at 96°C and “regular” flow at 7 mlps.
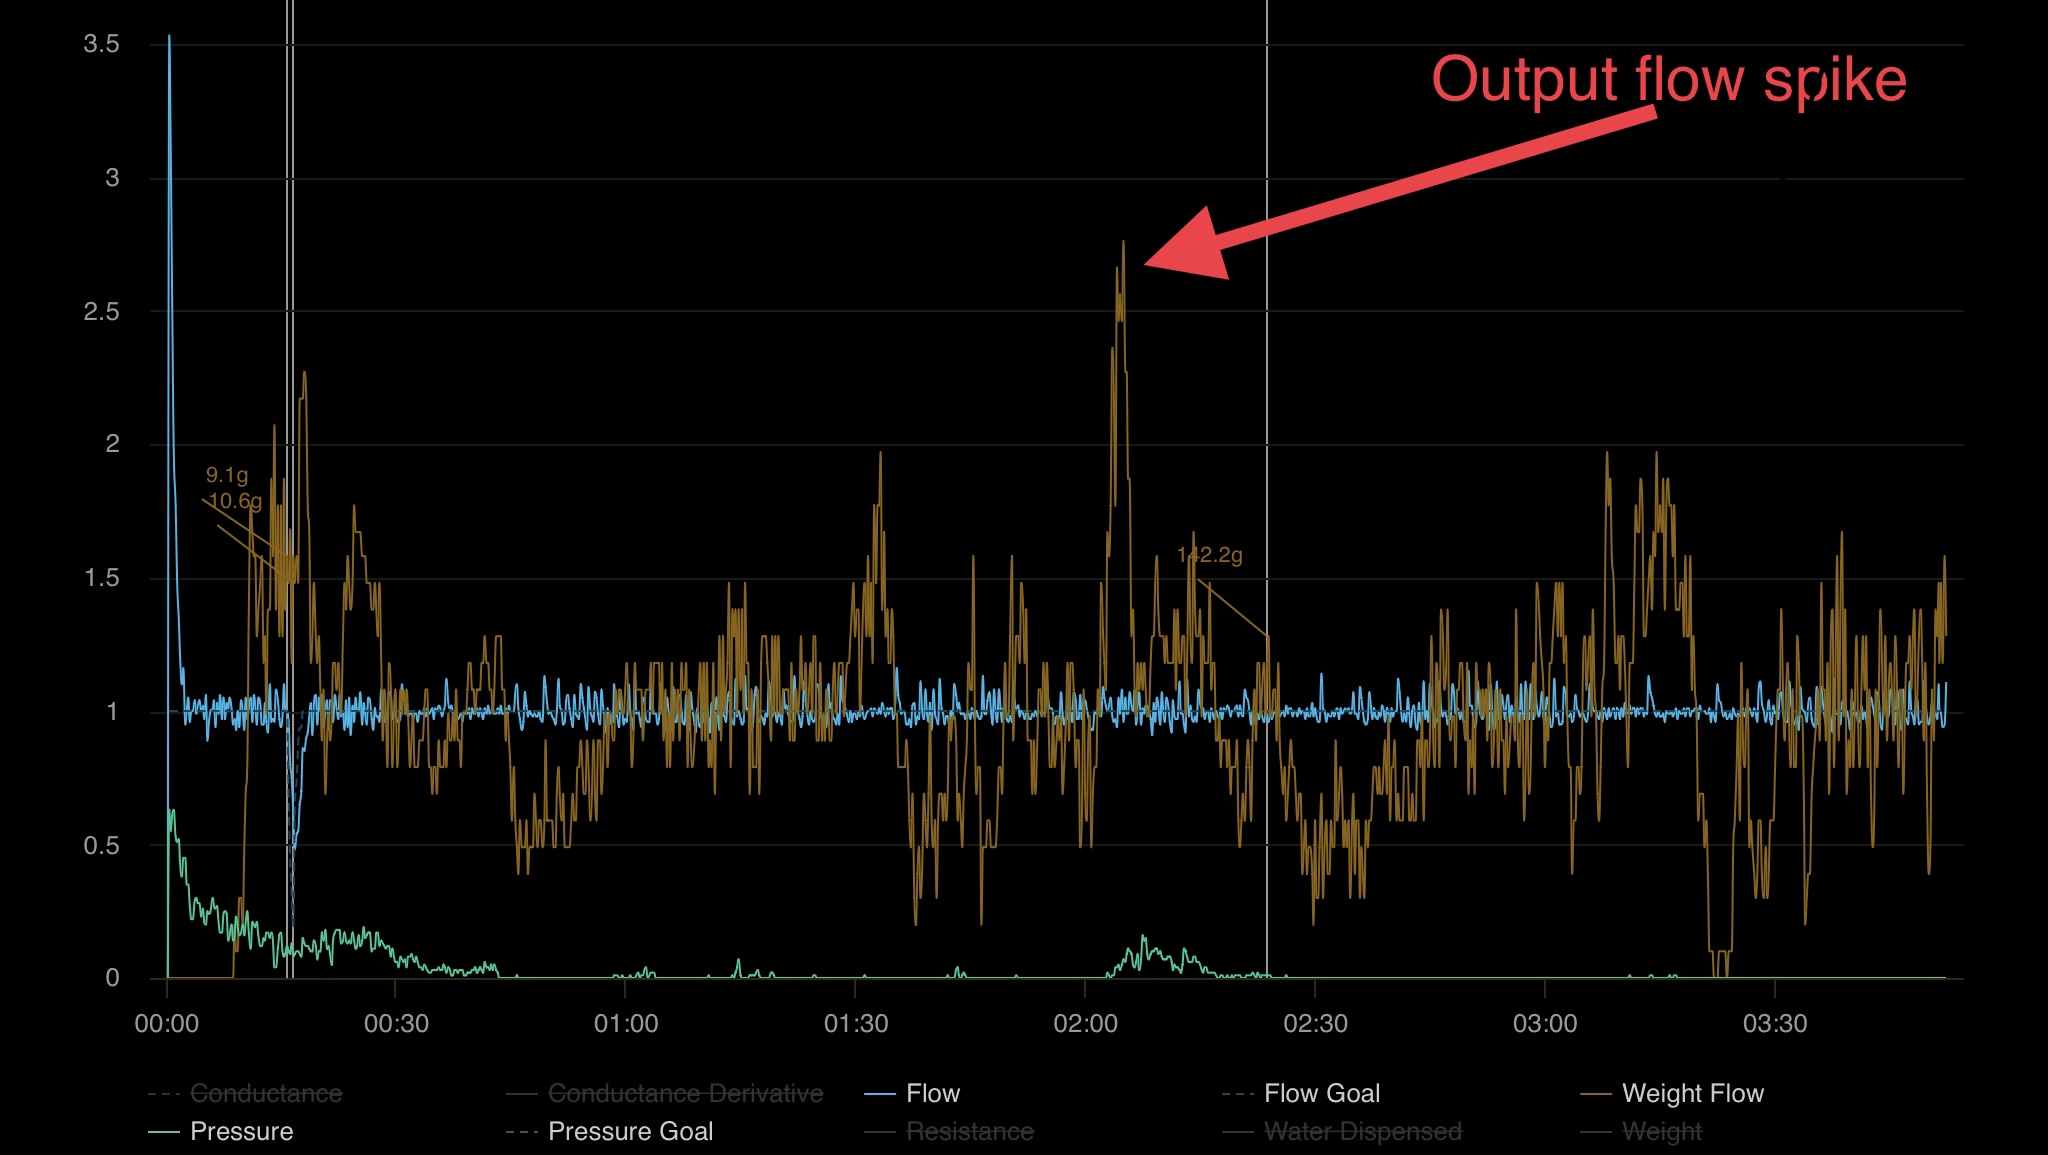
Another phenomenon that happens is you’ll notice occasional dips followed by spikes in flow. These also tend to coincide with when the mix temperature bump to steam happens. My hunch on what’s probably happening is that because a significant chunk of water volume (more than the target flow rate) is in gaseous phase, once it condenses back into water all at once, you’ll see a strong stream come out the basket bottom that shows up as a spike on the output flow plot. Remember that the pumps are pumping out water at the target flow rate, it’s the water’s behavior upon heating that causes the flow spikes.
Got no chill
So what if we reduced temperature? After all, if a kettle stream is arguably cooler than this when it hits a coffee bed, surely this should be more efficient. The only problem there is that a kettle stream and resultant slurry isn’t usually dealing with a coffee bed that’s barely a centimeter tall and ground very coarse. If you didn’t already know, a coffee bed’s height can have a massive effect on how it extracts. In filter range this usually implies that more solubles are available at a perpetually high solubility gradient. Since this isn’t an option in most espresso baskets as upto half the space will be taken up by group dispersion and puck screen, we have to inherently rely on things like temperature. At 93°C, the steaming effect was gone, but so was a big chunk of EY.
This led me to increase temperature in steps of 1°C, till I finally found that a 96°C target on my machine ended up being a happy balance point between how much steam was coming out the dispersion block (less than 98°C) and increased EY as compared to 93°C. There was however another issue that I was left struggling with despite this bump in temperature, and that is to reach a reasonable EY target, I was having to grind much finer than I would have liked – closer to 450 um from chirp than my preferred 550-600 um for a bed of this height.
Hogging the flow
I’m about to get a bit pocket-sciencey so brace yourselves. When grinding at 600 um from chirp I would occasionally get brews where EY would reach a reasonably good value for that coffee but I could not repeat that for multiple brews in a row. This form of inconsistency to me meant that when water flows in a certain way through the coarsely ground puck, it might be capable of extracting efficiently, but it’s possible that despite Ben’s super-efficient dispersion design, the phenomenon of part of the water volume at a given time in steam phase could potentially be disrupting things. Imagine then that there’s a region of the bed that received more water locally at the beginning than the region next to it, due to havoc being created by steam’s turbulence (someone smart please correct me if this comes under laminar), and the part that received more water initially, allowed more water to pass through that region over the course of the brew just by virtue of a somewhat large localized low tds zone giving less resistance for water to flow through, i.e., channeling. What if one could instead irrigate the whole puck and thus saturate it more evenly and reduce the extent of channeling.
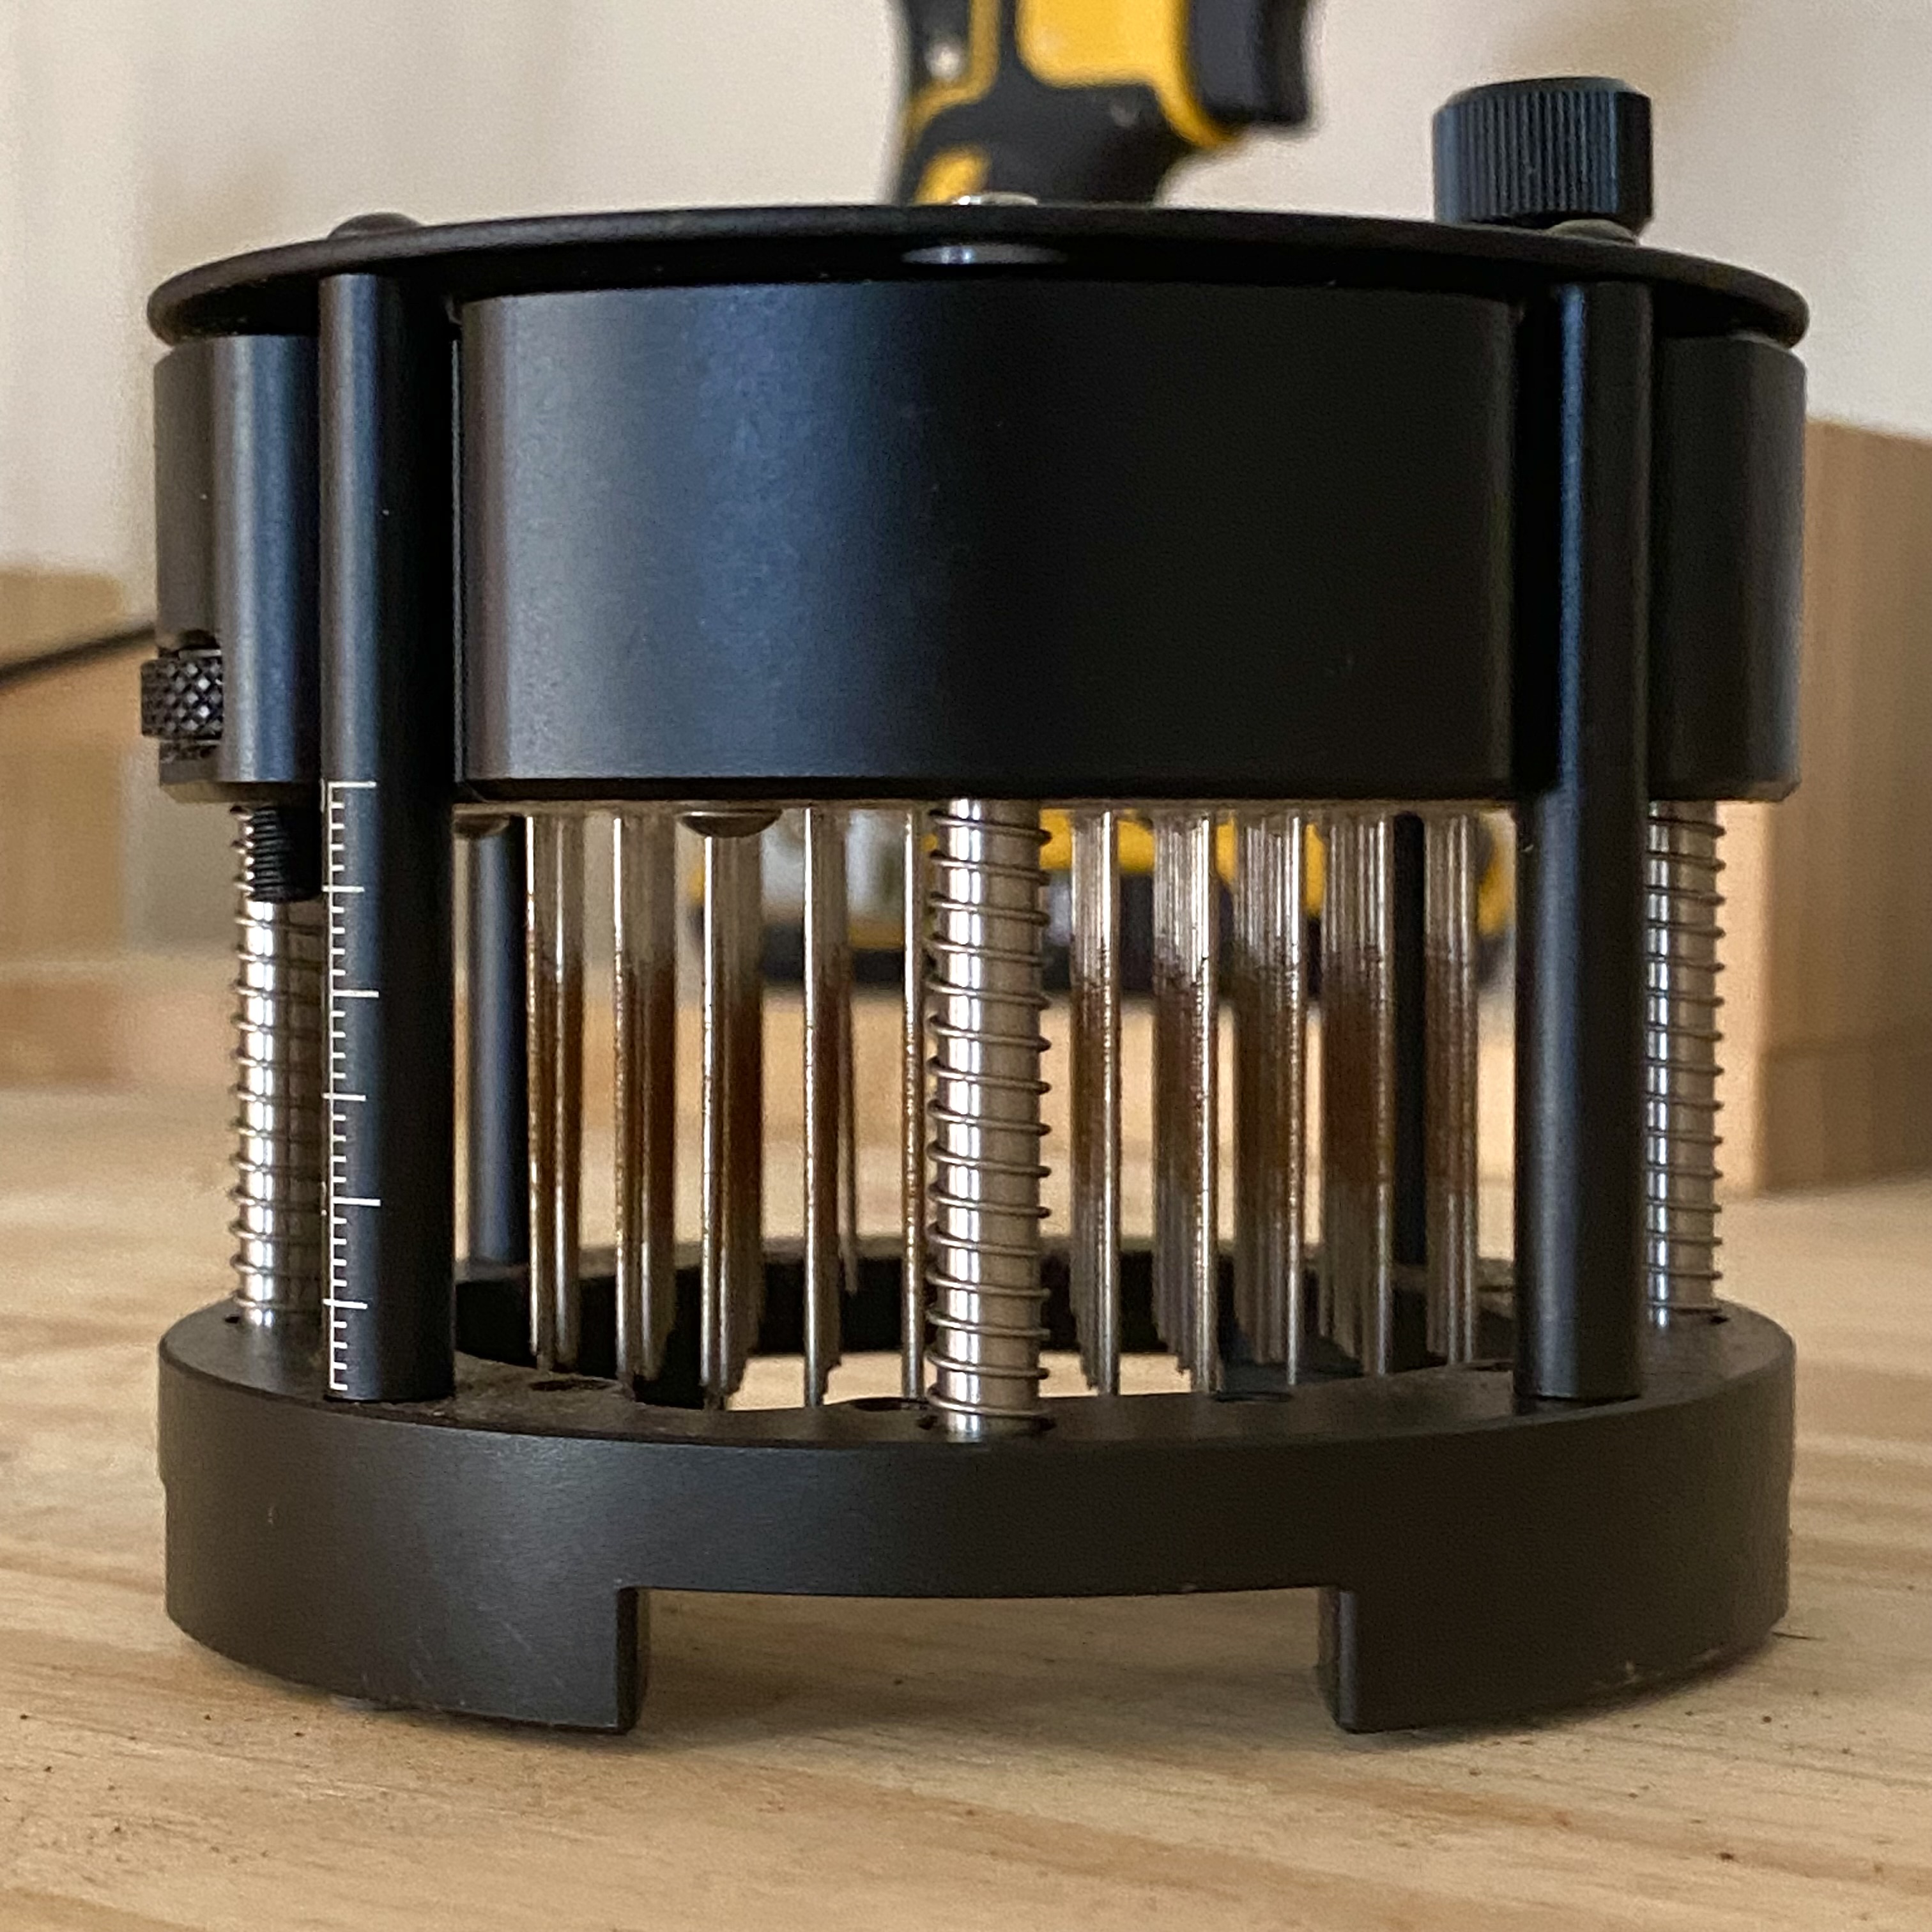
Enter the porcupress (or hog or kaktus). While there has been debate as to its efficacy in espresso regime, its advantage in case of this profile on this machine is beyond question. Inserting a 100 needles (somewhat thick) into the puck simultaneously has consistently allowed for water percolation in a way that’s resulted in increased EY at coarse grind settings.
How slow do you flow
If you’ve not already realized, contact time and flow rate are good proxies for each other depending on what aspect of coffee extraction you want to talk about. When talking about drip rate from a coffee bed, it’s flow that comes to mind. When talking compounds diffusing into water, contact time can be a more useful term. Since flow rate determines contact time, the flow rate range in which once can achieve efficient and tasty extractions becomes an important choice. In this case, to get filter like brews with output through a puck being 15x the dose (if you add back liquid retained this will bring you to 1:17 if you’re more familiar with dose to input water ratio), and to achieve tds of say anywhere between 1.3 to 1.6 tds (depending on coffee solubility) at around 600 um burr gap from chirp for a bed that’s about a centimeter tall and water needing as high a temperature as 96°C, I found that a target flow rate of 1 mlps was the highest I could go before contact time started getting insufficient. Going any higher in flow was necessitating a finer grind to achieve reasonable EY, and that’s not something I was willing to budge on easily. After all, the easiest way to get more EY in percolation is to grind finer, but where’s the fun in that.
Why make it so complicated
Christopher Feran who has finally revealed that he brews and roasts sometimes, had a novel idea – what if we add declining temperature as a feature to the profile? Apt usage of temperature decline in this profile can get tricky, especially since we’ve established temperature dependence of EY for this setup. Coffees that taste “clean” by one’s standards at cupping will probably benefit from having temperature high throughout the duration of a brew. If however there’s varietal, green or roast shortcomings (or a combination of all three) that’s showing through in the brew, using a high temperature in the beginning (bloom and the first minute of percolation) and then declining by 3°C every minute, seems to make stellar brews of coffees that would have otherwise not have been as enjoyable. If you choose to however reduce temperature as soon as the puck is saturated, keep in mind that if your individual machine takes a while to ramp to your target temperature (like mine does as a combination of firmware that’s tuned for stock brass parts and super slow flow rate that means getting hot water that’s upto temperature, or a little higher to compensate for how much it’ll lose along its way, to the puck, in it self will take some time). In such cases it might be prudent to let some water drip through (I like 10 grams) before initiating a bloom.
Do you even water bro
Look, I know nerds like myself are laughing stock because not only do we seem to think trivial things could matter, but we make things worse for ourselves by tailoring brew water to our needs by mineralizing distilled or RO water with specific salts. The problem though is that espresso seems to need more buffer per unit volume of brew water than filter. This also means that the same brew water cannot be used to make tasty espresso and filter at the same time.
While the topic of post-brew remineralization needs its own detailed post which it will get in due time, I was forced to try it out as I got frustrated switching between espresso and filter brew waters in the tank (despite the fact that decent makes it easy to empty water out from inside the machine). I repurposed my brew water mineralization concentrates by measuring out the average weight of each drop coming out the dropper and then back-calculating how many drops would get a certain volume of brewed coffee to desired gh and kh levels with post-brew remineralization. I then put RO water in my tank and brewed both espresso and filter with the same water, after which I added minerals post-brew as needed. The results were astoundingly tasty.
This also made me finally splurge on Lotus Drops since in today’s day I honestly don’t have the mental bandwidth to keep making a variety of concentrates, and that has in turn made me appreciate just how powerful post-brew remineralization can be, since so far I can’t say I have a clear favorite in terms of what minerals I prefer in terms of taste, but can definitely say that some coffees do better with specific minerals than others, and using gh and kh sources in isolation vs. in combination when targeting the same final hardness and alkalinity can have drastic effects on final taste. For now all I can say is I would be very wary of anyone who says with certainty “so and so mineral adds body and so and so mineral adds clarity”.
What about larger doses
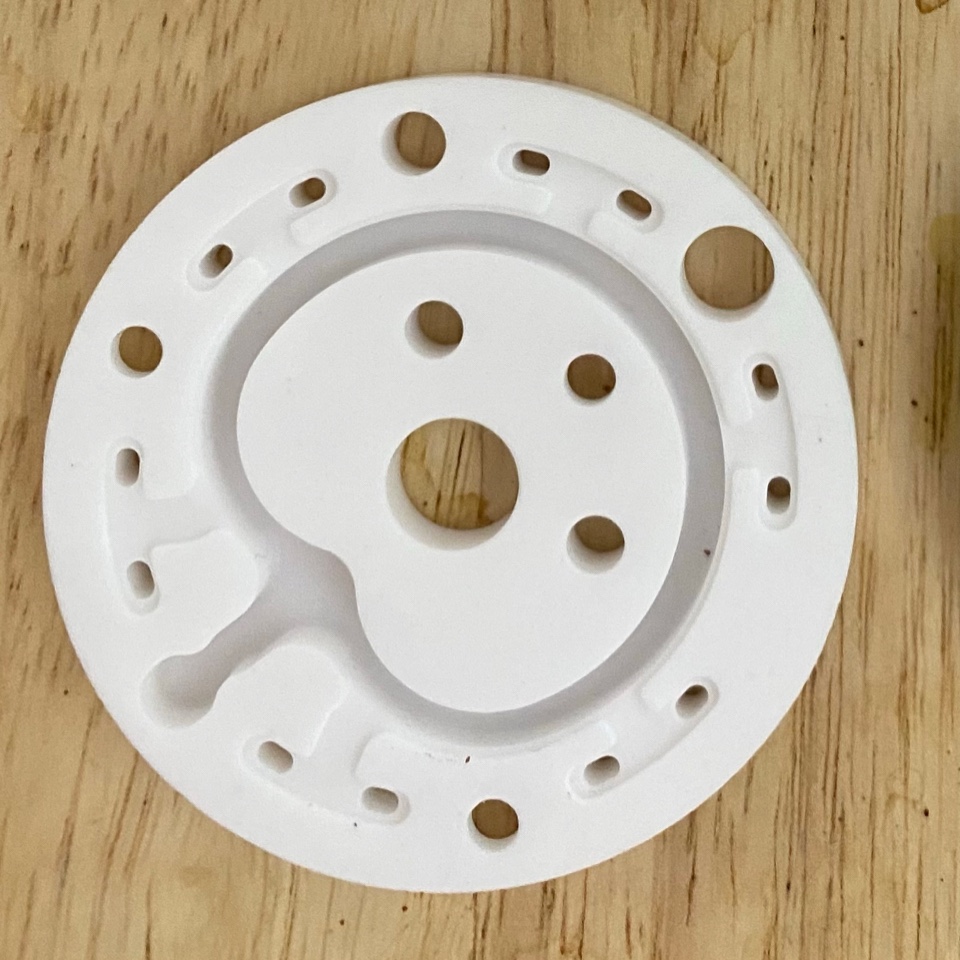
I’ve found that using 2-3 grams less than what a basket is rated for usually works better in terms of both taste and EY. My hunch is that the dispersion benefits from some pooling of water above the puck/puck screen to mitigate flow unevenness at high temperatures. This could also be why filter3.0 necessitates a tall custom made basket, but I’m not convinced that that’s necessary to get tasty filter brews from a DE1.
The no-bypass question
There is a component of brewing here that should not be overlooked and that is the shape of the bed and how much water gets to bypass it during the course of brewing. In theory a puck in an espresso basket should behave like a no-bypass brewer. Which also means that when the stars align, it’s an extremely efficient way to extract a bed of coffee evenly. But is that desirable?
I’m no stranger to no-bypass brews. I personally think they’re an excellent alternative to something like a V60. But those who love and adore their V60 brews, may or may not like no-bypass brews as much. In my experience, the brews I get using this profile are 85% of the quality of my manual V60 brews. Which is more often than not what I’d say for my well made tricolate brews, except this approach is way more consistent in terms of results. Hopefully one of these days we’ll get a cheaper version of something like Victoria Arduino’s PureBrew, to enable the uneven-by-design taste profiles of a V60.
To bloom or not to bloom
Ever since Jonathan Gagné kindly lent me a Nextlevel Pulsar prototype for testing (h/t Christopher Feran for the forward), my understanding of brewing has been severely revised, especially when it comes to blooms. Since the Pulsar is capable of steeped blooms, I initially started out with recipes that involved a two minute bloom. But try as I might, these brews always ended up with way too much body even at super coarse grind settings (like say 850 um burr gap). This made me wonder if long duration steeped blooms or alternatively long blooms in a no-bypass brewer are super-efficient, and therefore overkill.
Indeed when I wasn’t happy with taste-muting that I was initially getting when the profile had a minute-long bloom, getting rid of the bloom made the brews a lot more vibrant. This is just my way of saying that if you were to steal the profile from my Visualizer, know that the capability of bloom exists, I just choose not to use it in most cases
A note on fines migration
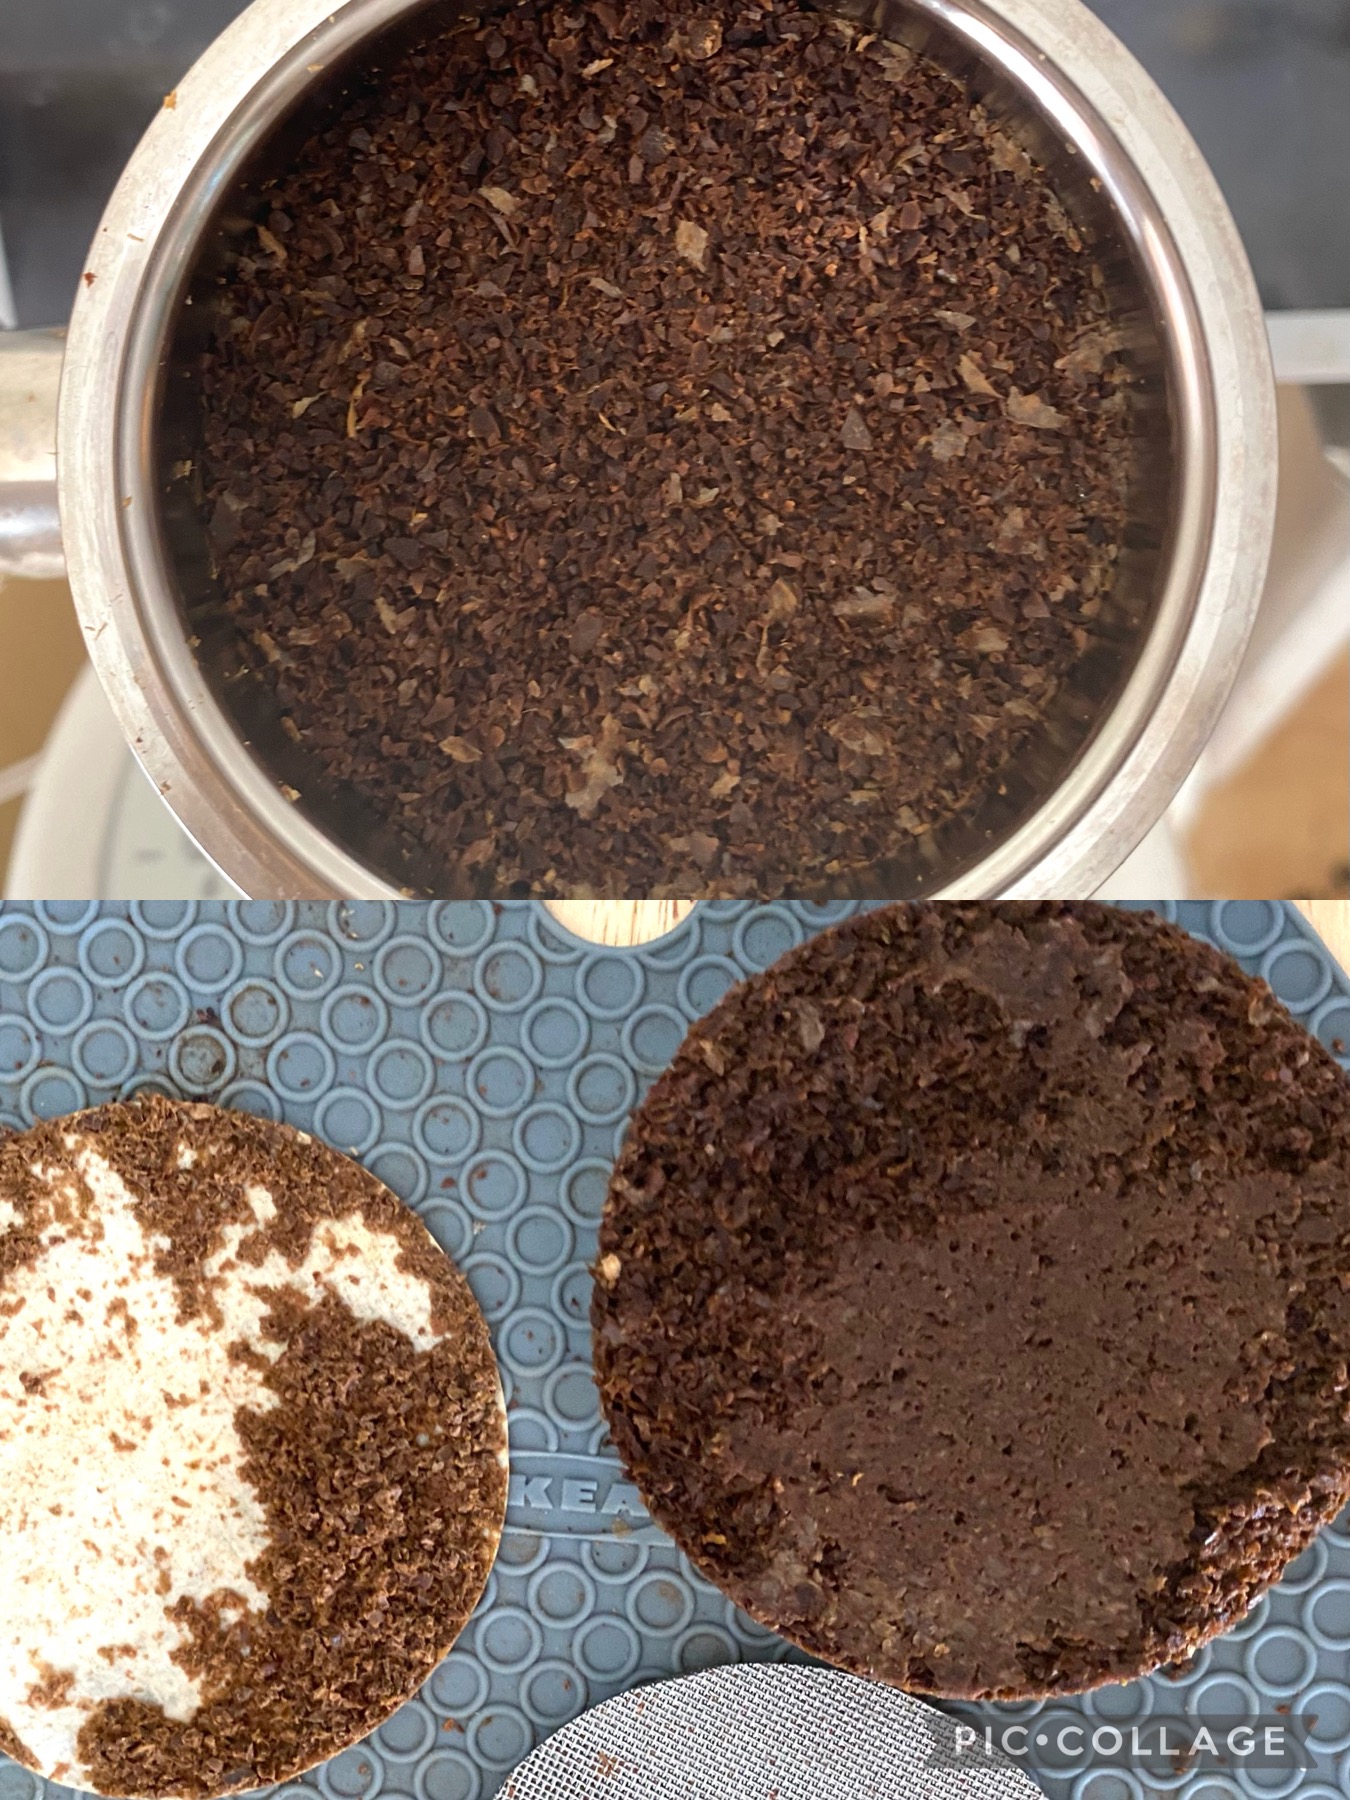
Fines migration is a concept that to me is fascinating to both imagine and see visual evidence of. While most percolation recipes are ways to mitigate fines migration in one way or another, this is less of a concern in an espresso basket because the extent of fines migration in absence of any external phenomenon like pressure is probably mainly dependent on water flow. You can however see in fig. 4 how many fines migrate even in absence of pressure at flow rates as low as 1 mlps. In presence of pressure across the puck, a big chunk of this would have made into your cup despite a filter paper at bottom.
People for some incomprehensible reason get scared upon seeing fines, completely oblivious to the fact that you can have pourover brew beds with a muddy bed that choke significantly less than beds with no fines deposition on top. Or that you can make coarsely ground doses of the same coffee choke more than a finely ground one. All this is to say that fines are a tool and not your enemy that you should spend time sifting out.
As for the effect of fines collected at bottom and their effect on flow pertaining to this profile, my take is that it is what it is. I’d instead think of ways to make this inherent migration as even as possible to keep the filter’s porosity even as the brew progresses. The best way to do that in my opinion is to ensure as even a flow as possible across the puck. This in turn will ensure that similar amounts of fines (across the puck’s horizontal cross section) get trapped by the bed along the way and similar amounts of escaped fines (across the puck’s horizontal cross section) make it to the bottom.
Recipe and puck prep
Here’s what you need to do in terms of puck prep and profile design to replicate my brews:
- Use a non-lab-filter paper at the bottom of your basket. Rinsing it will help it stay secure during wdt
- Dose out an amount that’s three grams less than your basket’s maximum recommended dose (I enjoy 15g in an 18g basket).
- Start with a coarse grind. I’d recommend 600 um from chirp when starting out and going finer only if you find it lacking in taste. If you don’t have a hog-style tool, I’d recommend starting out at 500 um (the finer grind will help you make up for yield deficiency in absence of a hog style tool)
- WDT the bed and make it as visually flat as possible
- Pierce the bed with your porcupress style tool if you have one
- DO NOT TAP
- Don’t tamp. Instead place a puck screen on your bed and press gently to ensure that it’s compressed and level
- Attach your portafilter into the group and start saturating the puck at 1 mlps and 96C
- If you wish to bloom, cut off flow once you have 10 grams in the cup
- Continue making water flow at at 1 mlps and 96°C till you reach your desired beverage weight
- If you wish to induce temperature declines, do so in decrements of 3°C after each minute
- If you’ve used distilled or RO water to brew, remineralize to desired hardness and alkalinity levels based on coffee and taste preference
Can you believe it’s not filter
I came up with this profile in my attempt to make a sprover but in the process realized that it’s quite possible to make consistently delicious filter coffee with decent amount of flavor separation while yielding reasonably and do so in a hands-off manner. I don’t think this is a sprover. Because that’s a different profile and I’ll talk about it soon.
However, over the last three months it’s been quite something to prep the bed, push a button, walk away and either make breakfast, attend to toddlers’ demands, do dishes or quite literally do anything else other than be involved in brewing. The power of automating tasty filter coffee is unreal. The taste has been consistently good enough for me to exclaim out loud and hence name the profile “I Can’t Believe It’s Not Filter“.
Acknowledgements
- Christopher Feran for guiding me on how to make such a profile suitable for cafe usage and also for recommending a temperature decline
- H&S, Botz and Moodtrap for consistently nailing their roasts so I could use them for developing this profile. This way the only thing I could blame when things didn’t taste good was the profile and not the roast.
If you’ve made it till here, consider supporting NOT me, but the hourly coffee worker by donating to GoFundBean
Subscribe to keep your pocket updated with coffee science.

Leave a comment