A problematic thing about being involved in discussions with DE1 owners is that you are bound to have a lot of FOMO. The shiniest and latest is always on display and there’s always the question of whether or not you’re getting “the best possible”. The “what” of “the best possible” can be anything from the latest grinder on the market (or on kickstarter), the latest puck-prep tool, the latest fancy dripper (yeah a bunch of espresso folks also apparently like brews), the best possible accessories, the list goes on. So much so that I started second-guessing my already questionable barista skills on an extremely expensive and very capable grinder like Niche Zero. It may surprise you (as it did me) that the Niche, even though very expensive, is still relatively cheap in contrast to some of the “fancy-fancy“.
No pressure though
Being a bit of a headstrong person has both advantages and disadvantages when it comes to something as complex as coffee. A big personal disadvantage is that because something seems to give a tasty drink for a given setup, my inexperienced and immature mind tends to assume that it applies across a wide range of setups. So imagine my absolute aghast expression as I failed to ramp pressure using the original blooming espresso recipe on 64mm SSP-MP burrs (henceforth referred to as 64MP burrs for the rest of this post), installed on DE1 user Matthew’s very capable DF64. The typical behavior I observed was that despite grinding very close to chirp (the sudden harsh sound one’s burrs make when they touch during operation while tightening grind without any beans in the hopper), the puck wasn’t able to build pressure. Visually it seemed like almost all the solubles were flowing out during the default 30 second bloom, and despite increasing the fill flow rate from default 4 mlps to 8 mlps to reduce soluble loss during preinfusion, I still failed to ramp pressure beyond 2 bar when water started flowing again after the 30s bloom.
This was unexpected. I mean beyond feeling real awful wasting some beans in the process, it was a big reality check on my assumptions about how grinders, and more specifically, burrs operate. Meanwhile a few feet away on the day of the meetup, JoeD was pulling shots using 98mm SSP-HU burrs (henceforth called 98HU burrs) on his P100 for the rest of the folks present and I casually happened to sip some of it (this was during the pandemic so was done in open space, post-vaccination, in a ventilated area, with shots first poured into a small milk pitcher and then poured into individual cups for sipping). Let’s just say my brain went “I never knew espresso can have so many layers of flavor in a 1:2 shot!” As I would later learn, this wasn’t just a flat burr vs. conical burr thing, but even among flat burrs there can be some that are very close in flavor to conical burrs, and 98HU definitely wasn’t one of them.
A Niche thing to do
This temporarily resulted in a phase where I tried achieving high-EY 1:2 shots on the Niche using whatever variable I could alter, including using blooming shots, appropriate temperatures, ensuring tasty pressure ranges, reasonable water hardness (all of which I’ll write about in the near future when I discuss how to get consistent high-EY shots on a Niche + DE1 combo). But try as I might, even though I got tasty high-EY shots, the flavor separation of 98HU was stuck in my memory. So much so that I even attempted getting a DF64 paired with MP burrs for myself, but the burrs unfortunately turned out to be faulty (I wasn’t able to choke the machine on profiles that are good standard for DF64 + MP combo) and I was in a phase in life where I was not determined enough to see that approach through, and ended up returning the equipment.
THE Superjolly
A few things then happened over the course of the next few months. I was able to get my operation of the Niche to a point where I was relatively happy with the shots. The FOMO triggers in the Decent community, especially on discord, had now shifted to Bentwood Vertical 63 and Option-O’s P100. Although the Bentwood seemed to be an excellent grinder for both filter and espresso, I kept thinking about the 98HU shot. At the same time, P100 pre-orders sold out in less than a minute and I kept imagining a day in 2022 when Hoffmann would review it and it would sell out quicker than that, if that’s even possible. And then news came of Levercraft canceling any further sales of the Ultra (probably the strongest competitor to P100), which meant that getting a P100 anytime soon seemed doubtful. In all fairness, Hayden of Option-O acknowledged that the radically quick sellout of P100 was a problem and indeed pre-orders of the grinder in recent times have been a lot more accessible in terms of availability.
By now you must be wondering why I keep bringing up 64mm MP burrs when my reference is 98HU. JoeD in the not too distant past used to own a Mazzer Superjolly modified to do single-dosing and fitted with MP burrs prior to (and briefly alongside) the P100. He had always been insistent that 64MP was ridiculously close in taste to 98HU and in fact always encouraged folks to try out MP burrs on DF64 before deciding to spend on any of the expensive grinders. Joe eventually ended up selling his Superjolly (fondly nicknamed “Frankenjolly” by Joe because it didn’t resemble a stock Superjolly anymore) to DE1 user Nate out in Northeast USA. Meanwhile, arguably the best-in-class grinder for 64mm burrs Option-O’s P64 suddenly became scarce. To make matters worse, Prima Coffee Equipment, the only dealer for P64 in USA, had to increase its price by $400 due to an increase in import costs during the same time period. Hayden once again stepped in to work it out with Prima to ensure the prices were reverted. For perspective, $400 can get you close to the purchase price of some capable espresso grinders and definitely can get you excellent hand grinders that can deliver great espresso shots.
This is the exact point at which I took a leap of faith and reached out to Nate as he had put up the Frankenjolly for sale. Once it arrived, I now had a 64mm burr carrier whose MP burrs had been through at least 15-20 kilos of coffee between its two previous owners and whose internals are built to withstand demands of a cafe.
Layers upon layers
And so I got started prepping my espresso setup for the Frankenjolly. The first change I had to make was the brew-water itself. I did have a bit of a head start here – a lot of folks on discord serves of Decent and Espresso Aficionado Forum (EAF) who used 98HU burrs had begun preferring brew-water consisting of 20GH (general hardness) and 90KH (carbonate hardness also referred to as alkalinity and not to be confused with pH). If you’ve ever attempted to go down the essential rabbit hole of making your own brew-water, you’ll know that the values stated above are extremely out of the ordinary. More often than not, 80GH/40KH is a reasonable starting point, but the efficiency with which 98HU burrs extract, they not only extract the good parts of a bean with ease but also the not so tasty parts. If I’m not mistaken these values were arrived at by Joe after he found that using his extremely soft RO water was not cutting it in terms of the astringency he was still getting from some of the coffees he was brewing at the time. Ultimately the 20GH/90KH combo became the preferred hardness levels of a lot of 98HU and 64MP users. I, on the other hand, was hesitant to make such a change right away. I decided to keep my hardness at 85GH as it was on the Niche with alkalinity bumped up to 55KH as opposed to 40KH on the Niche. The shot that I pulled using MP burrs for the first time had me recovering from the onslaught of layered flavors that hit my mouth. Although it seems like a long time ago now, the radical departure in flavor separation from Niche even at similar extraction yields blew my mind. As I pulled more shots with the grinder, I finally ended up with 40GH/70KH as my goto water recipe (I’ll revisit this later on). As an aside, 55KH also smoothed out my shots on the Niche in terms of any remnant harshness at high EYs.
The workflow ain’t so Niche
The biggest change to my workflow with the Frankenjolly at first was to get dose-in-dose-out within 0.1-0.2 grams. Remember that zero-retention is a myth and a marketing term. What it implies though is that the amount of “exchange coffee” left in the grinder is a pretty low amount. Any modern day titan grinder and the Niche Zero are good examples of this. Whereas the workflow on the Niche was as simple as weighing out beans, dumping it in the dosing funnel, collecting it in the portafilter, wdt, tap, tamp, put puck screen, and you’re all set, the workflow on the Frankenjolly to get within 0.1g of input dose is a bit more involved. Here’s my current routine:
- Weight out 18g dose within 0.1g
- Purge some beans
- RDT to reduce clumping
- Grind directly into portafilter
- User puffer in hopper and knocker to ensure retained grounds get into portafilter
- Tap knocker to get remnant grounds into portafilter
- Check if dose is within 0.1g of target weight
- Use a WDT tool to move grounds around
- First use a circular motion to redistribute
- Then use side-to-side and back-and-forth motions using no more than a quarter inch of movement to declump (this has made a massive difference in my case)
- Continue side-to-side and back-and-forth motions while getting more and more shallow, until you’re finally only raking the top surface
- Tap gently to settle grounds (necessary evil, I don’t feel too good about this)
- Tamp twice using self-leveling tamper while ensuring leveling plate of tamper is flush against basket rim
- Gently slide puck screen onto top of puck.
- If using filter paper at bottom, Consider using needles with pointy ends and also wetting the paper, as in my experience this results in less movement of paper
Remember though that avoiding some of this stuff is why you pay a premium on titan grinders. A steady rpm of ~1600 and some clumping is something I’ve chosen to live with and address as opposed to getting virtually clump-free grounds from the Niche. But this also cost me much less than the Niche if you consider that I didn’t have to spend much on seasoning beans. Again, remember that retention is different than exchange, which in turn is different than dose consistency. In case of the Frankenjolly, my usual delta between dose-in and dose-out is 0.2 grams, with increased delta when changing between filter and espresso. When I removed the single-dosing mod components, the total retention (not exchange) came to about 6 grams. This is excluding what’s trapped in the burrs crevices, which I haven’t yet removed. The exchange amount seems to be reasonable, even though incalculable with the equipment I have. I usually don’t end up with sink shots when moving from filter to espresso grind size, although I have to purge a bit more than I usually have to. Conversely, I usually try and purge and knock as many small particles off as I can when switching from espresso to filter.
30 seconds or I ain’t havin’ it
The commonly accepted criterion for how long an espresso should take to brew is 30 seconds from when the pump is engaged with a margin of error of about two seconds (five seconds if you’re being generous). There are exceptions to this of course. Michael Cameron and Mat North both have advocated for 6 bar/40 second shots. However the most ridiculous (the good kind) variation on this has been turbo shots. Michael Cameron and Christopher Hendon both woke up one day and decided to pull 15 second espresso shots. I’m joking of course – they investigated why extraction fell off a cliff when you ground too fine and published it in a peer reviewed journal. To explain it in an oversimplified pocket-science way, they found that for every 1:2 ratio 30 second shot of given EY, there exists a 15 second shot with the same EY but at a much coarser grind and possibly longer ratio (say 1:3). This kinda shook the coffee industry a bit, at least as far as the definition of “what really is espresso” is concerned. The problem with anything coffee, is that as soon as you change one parameter, it manifests as detectable changes in other parameters as well. In case of turbo shots, the ratio increase may come at the cost of reduced perceived body. In a way, you may have traded some mouthfeel for consistency and speed while maintaining EY.
This however can be burr dependent. We are somewhat at the beginning of an era where tiny changes in burr geometry are being exploited to have massive impact on taste. 64MP falls under what I (and many others) call fast-extraction burrs. As the name implies, their grind distribution works in a way such that a big chuck of max extraction yield that gets you to “tasty point”, gets done within 15 seconds. This may create a bit of a problem if you’re approaching them from a traditional espresso dial-in perspective, like say grinding fine enough to create enough puck resistance to make the shot last 30 seconds. Think of it this way – for a grind distribution that extracts very fast, you’ll need to compensate with a much finer grind to make the shot last as long as a grind distribution that allows puck resistance to sustain longer. So much so that it may push the puck into the “clogging zone”, i.e., it may have pushed extraction past the peak extraction point referred to in Cameron/Hendon’s paper. Miraculously though, if you applied the same concept of coarsening grind and trust yourself to finish the shot within say 15 seconds, these burrs extract so, so fast that you can achieve desired optimum extraction yield at 1:2 ratio within those 15 seconds. Not only that, their speed of extraction has necessitated that I use lower GH values (40 as opposed to the traditional 80) to even be able to stretch ratio beyond 1:2. Conversely, to avoid mitigate some of the increased harshness that these burrs can extract with precision, I’ve had better success with higher alkalinity values (70KH as opposed to the more traditional 40)
You can pull but can you brew
Ever since getting the DE1, percolation brews had taken a backseat in life. The machine warms up quicker than my kettle and within the time that I have ground into and prepped the puck, the machine is usually ready to pull a shot. That’s my way of saying it had been a while since I had been forced to think long and hard about pourovers, because a shot of espresso is a quicker process and the misery of a bad shot lasts much shorter than the misery of a bad brew. I took it for granted that burrs that are stellar at espresso will be stellar at brews no matter what. I was in for a rude shock.
My percolation brewer of choice at the time of writing this is the Tricolate. I plan to cover the good and the bad of the brewer in a future post, for now I’ll just stick to the dial-in experience as it pertains to 64MP burrs. (I’m now about to embark on a bit of pocket-science, but I’ll try and make up for it with some more hopefully solid pocket-science towards the end.) My goto recipe for the brewer for traditional burrsets is about 1:16 ratio of coffee to water, using 100C brew-water composed of 85GH and 30KH. While I had previously been successful in dialing-in tasty brews using these parameters on both the Baratza Encore and the 1ZPresso KPro, the 64MP brews turned out to be … boring. I tried all the usual tricks – grinding slightly finer, grinding slightly coarser, varying ratio between 1:16 and 1:19, but try as I may, I was not able to get a tasty brew. And this wasn’t the only heartbreak.
I wanted to rule out water as a possible cause, so I made a brew-water batch using ThirdWaveWater (TWW – predicted to be at 170GH/50KH). The possibility of it seemed very unlikely to me given that I’ve not had to vary my GH/KH much in a really long time for percolation for the grinders I’d used thus far. However upon using TWW, all of a sudden, flavors burst through as if a dam had broken. Since TWW’s GH is significantly higher, I wondered if that’s what made it extract so much, such that it even made up for the somewhat increased alkalinity.
There is an aspect of the tricolate that manifests in brews much easier as compared to other grinders – the extraction (if the bed is thick enough and flat) is so even, and so bereft of bypass, that if the grind is even a bit too fine or if the ratio is a bit too high, the brews taste muted. In my experience this usually manifested when the extraction is a tad higher than where you would get tasty results.
Add to this the interesting theory floating around that 64MP burrs extract this fast because they generate a lot of fines. Like significantly more than what we even expect for conicals like the Niche. If this is true, my thought process went, that would mean that a significant part of extraction could be coming from those fines, and could be contributing to the muteness. What if, I thought, the balance of extraction is such that the acidity is being muted by the alkalinity provided by 30KH, and may instead benefit from much lower KH as compared to GH, like in the case of TWW, only this time with lessened GH. Sure enough, as soon as I switched to 120GH/10KH, the brews became tasty again. I was now ready to take out my refractometer and measure extraction in all its glory. Time for my second heartbreak – try as I may I was not able to push past 18% EY on most coffees.
Don’t get me wrong, the brews weren’t bad, tasty even, but something just didn’t sit right with me getting lower than expected extraction yields. And then I started thinking, if there indeed are more fines, then grinding finer should get me the desired EY at a much shorter ratio, much like in turbo shots. And so I did. And it worked! 64MP burrs were now giving me smack-dab-in-your face flavors at expected EYs at 1:10 ratio at 450 micron burr spacing (I was previously at the 700 micron mark). The drink was obviously very intense, with bypass water needing to be added if the tds was to be brought down to the 1.3-1.4 tds range as compared to the 2 tds+ output. But we finally had a working solution, even though it’s not conventional.
This was both odd, and a fun finding. Please however do not take this to be the only way to get high-EY brews with 64MP burrs, but instead as just one of the possibilities. The high-tds brews did take a while to get used to, but they’ve been lovely short clean delicious evening drinks. On the bright side, you’ll use less water (kettle warms up faster), but then again you may have to vary your pour sizes if you intend to do split pours. Short ratios work for a V60 as well, although I’m preferring them slightly longer at 1:12.
Fine(s), but where’s the proof?
So I thought the right thing to do would be to describe the process in a blog post. And the right way to go about this blog post would be to try and plot grind distributions of samples from 64MP against samples of other grinders. Here’s where I would like to pause, and give you context – we’ve come from an era of speculating based on anecdotal findings and taste preferences and sharing recipes with no baseline whatsoever for water, grinder, burrs and palette preferences to an era where it’s possible to plot particle size distributions (PSDs) sitting at home, all thanks to a certain astrophysicist’s dedicated love of filter coffee (and also other coffee). This next part would not have been possible without Jonathan Gagné’s Grind Size Application. It takes a bit of patience and perseverance to get upto speed, but once you start seeing the plots, I’m filled with a sense of amazement at the amount of information they give us (and also that this app has been available for three years now!).
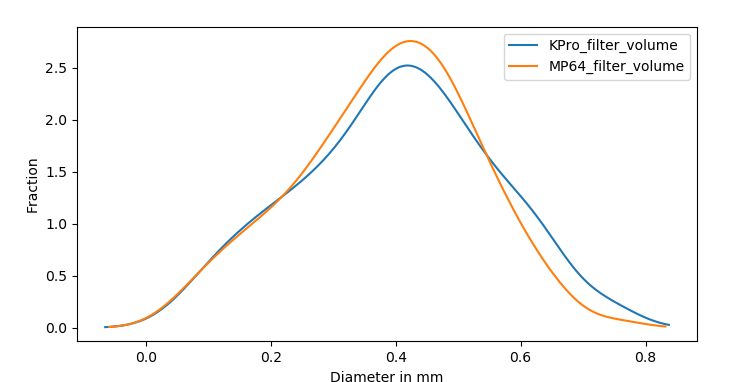
There’s a lot of parameters based on which one can try and compare grind size, but unfortunately, very few parameters exist that make it even somewhat objective. In my case, extraction yield was the easiest one that I had access to, however limited it may be in the amount of information it conveys. Ironically, comparing for espresso turned out to be easier than comparing for filter. For espresso, for purposes of this discussion, I chose to go with targeting similar EY (within 0.5% EY delta) at the same ratio. I chose to pull a shot each on the Niche Zero and on the Frankenjolly targeting about 20.5% EY of the same coffee. For Niche, I used the blooming espresso profile to my advantage to get more EY at a given ratio at the cost of longer shot time and extremely fine grind. For 64MP (Frankenjolly), I used the turbobloom profile to get more EY at a given ratio at the cost of shorter shot time and a very coarse grind. The visualizer link showing details of the shot on the Niche can be found here and for the Frankenjolly shot can be found here.

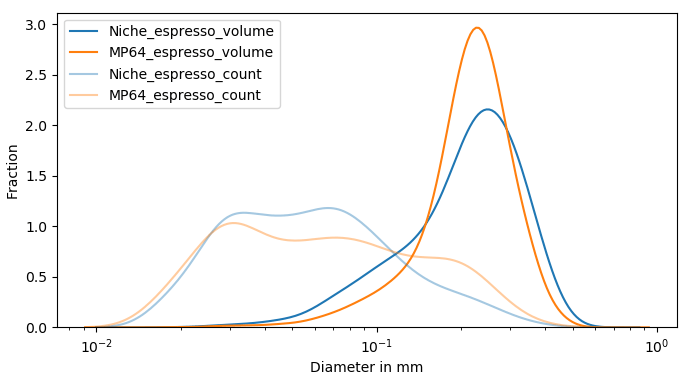
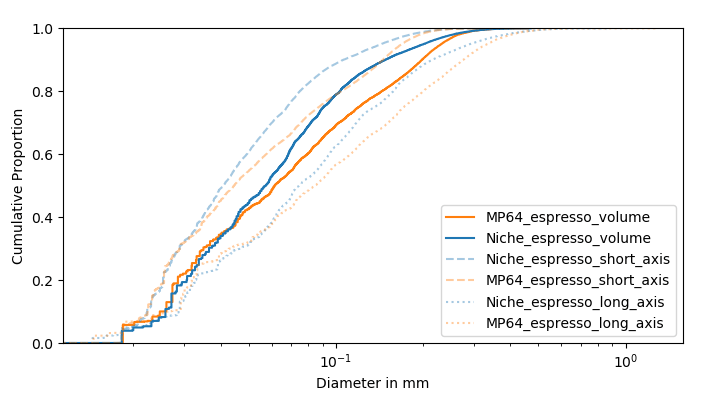
So, looking at the PSD in figure 3, how does the “high fines” theory of MP burrs hold up to scrutiny? Before I comment, please keep in mind that these PSDs are limited by my human ability to separate fines from boulders, in addition to the limitations of image processing. Note that this isn’t really a limitation of imaging capabilities of the app itself, but rather the extent to which we can provide it refined data. With that out of the way, at the time of writing this, I do not think the high-fines theory of MP burrs stands up to scrutiny. The Niche seems to have both a taller and wider fines particle count peak and a shorter and wider boulder volume peak as compared to 64MP burrs. A quick comment on the “fines” particle count peaks around the 70-80 micron mark – I’m not entirely convinced that all the particles in that region are fines. It’s actually pretty hard to get rid of chaff that has been sliced up by the burrs, and this clouds the data accuracy a little bit in that region. However, assuming that the extent of noise added to these distributions by chaff is the same for both Niche and 64MP (which may not be the case in reality and maybe skewed depending on burr behavior), for now I’ll go with the theory that both the fines peak, the chaff+fines peak and the boulder peak, are all much more narrow in case of 64MP. This has some important implications – first of all, a narrow boulder peak could potentially result in the puck losing resistance quicker due to more boulders losing their solubles at the same time. If you notice the volume of solubles contributed by boulders, it’s mind-blowing how little they contribute in terms of the particle count and yet occupy such large areas under the volume curves. So in case of the Niche, even though there are particles that are potentially losing all solubles quicker than 64MP, there’s also a pretty big volumetric chunk that’ll either need a larger volume of water to extract (longer ratio) or much longer contact time (blooming espresso).
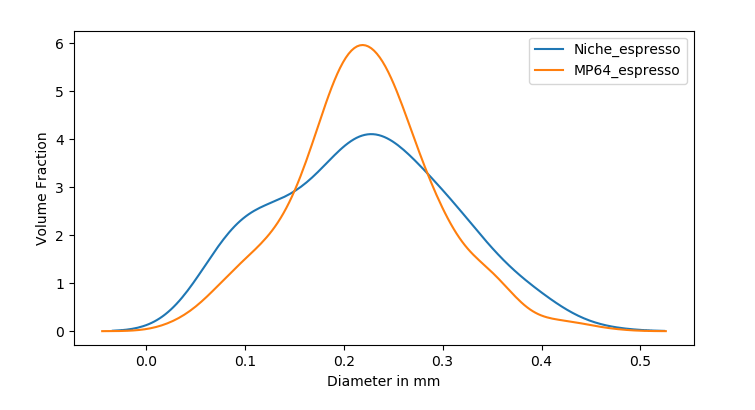
When you look at the fines distribution, it’s equally interesting. A potentially more narrow fines distribution (30 micron peak) in case of 64MP could imply that a large chunk of fines may find it easier to travel in between spaces between boulders (migration), whereas a shorter peak for 64MP at the 70 micron mark (provided it’s not all chaff) may imply that a lesser percentage of particles get trapped between boulders (also migration), thus leading to lessened overall resistance. All of these could in theory could be occuring simultaneously to create the resultant behavior we see during turbo shots on these grinders that result in high EY despite the short ratio (for turbo) and shot duration. Imagine the opposite effect for Niche – a bigger proportion of “larger” fines or maybe medium sized particles could potentially result in these particles clogging more spaces between boulders causing a much higher puck resistance.
I’m going to “pause” here for a bit to make some acknowledgements before proceeding to the filter percolation part of this post:
- Jonathan Gagné: For everything from his blog posts since several years ago, his book (that I highly recommend you purchase), obviously the grind-size app, and for generously spending time evaluating my graphs, improving their quality and poking holes in my pocket-science theories with real science so I can do a better job
- Carol (Higher Priestess): For repeatedly pointing out that screen-readers don’t necessarily read alt-text and to instead use full descriptions of images in a post directly. Please follow their page for some great lessons in accessibility and inclusion
- EAF user and coffee blogger Shay: For patiently working with me to improve the quality of my PSD plots, else you folks would have been left with noisy charts. For the record, Shay had also advised plotting histograms along with density plots for even better data quality, but I chose not to for ease of visualization. Shay also has a blog that talks about true coffee science (that’s not pocket-science)
- EAF user Fam: For generously lending me their code for density plots and histograms. Check out their webpage for fascinating comparisons between distributions of various grinders, burrs, coffees and a lot more
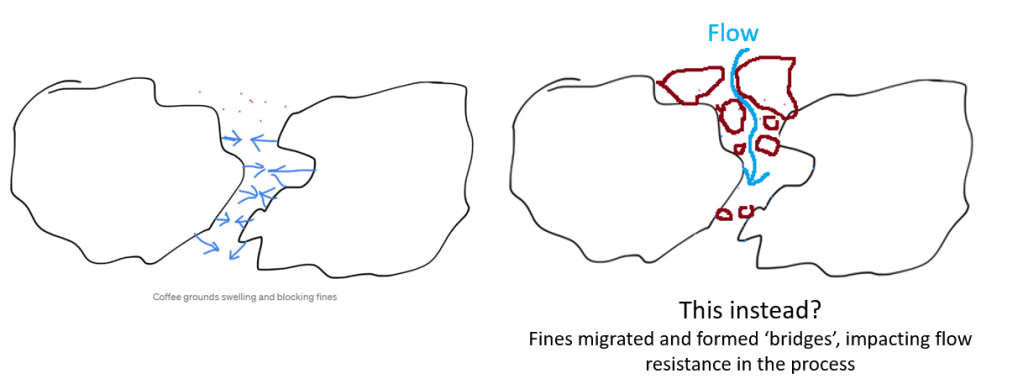
- Decent Diaspora user Sam Law: for generously allowing me to use his rendition of the phenomenon of fines migration. Coincidentally, several years ago Sam had talked about and posted a video on HomeBarista that till date for me is the most gorgeous visual demonstration of fines migration of coffee particles
- EAF user Shotwell: For encouraging the grind PSD discussion that led me to continue working on improving the resolution of smaller particles with image processing
- Daniel Flück: For making Coblis (Color Blindness Simulator) available to check color-blind-friendliness of images.
Filtering the chaos (somewhat)
I initially wanted to do filter brews using the two grinders (in this case the Frankenjolly and my KPro), using a similar approach as espresso, i.e. use the tricolate for 64MP and a percolative immersion but using the clever dripper to brew using both burrs to within 0.5% EY and same ratio. Percolative immersion turned out to be a tad challenging in the clever dripper (it’s theoretically possible, but at the time of writing this I haven’t figured out the correct workflow to get me desired results. If I figure it out, I’ll write up a separate post on it because I absolutely love the clever dripper). So instead, I chose to go with getting the brews within 0.5% EY but at different ratios. I used 100GH/10KH for 64MP and 85GH/30KH for KPro to bring out taste profiles that my palette currently prefers for each of these burrs.
I had initially assumed that it would be possible to get a tasty drink at low ratios by grinding fine even on the KPro. As in everything coffee, I was in for a rude shock. As soon as I tried grinding even a bit finer, the brew would stall. Imagine my disappointment then, as I’m among picturesque pine trees in a cabin in San Bernandino National Forest, ready to take a picture of liquid brown gold seductively trickling down – and the coffee refuses to drip. I eventually had to grind significantly coarser than I had assumed, and once I started measuring EY, the only way I was able to get the KPro brew to match up with 64MP, was to increase ratio and grind coarse.
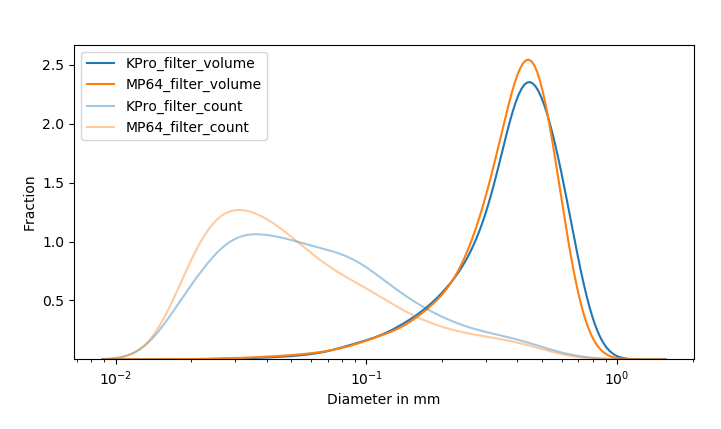
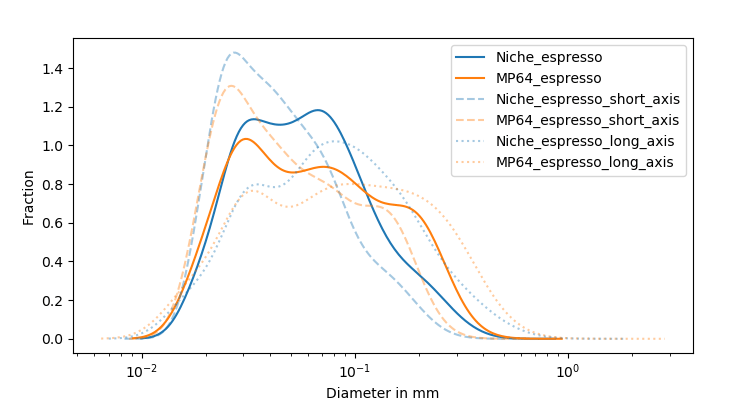
In case of the filter brews, I’m left with more questions after looking at the distribution plots. This time around though, I’m hesitant to dismiss the “more fines” theory. At first glance, it seems as if the fines peak is more narrow in case of 64MP, with the KPro having a prominent peak at the 100 micron mark that sits a lot taller in the region as compared to the 64MP curve. However, I’m not entirely sure these are fines or even all coffee particles. Instead, once again, it’s quite possible that there’s chaff fragments mixed in there that are hard to eliminate. However, if I were to go with the assumption that the noise created by chaff is equal in case of both 64MP and KPro (which could very well be a wrong assumption if in reality KPro’s burrs just slice up chaff into relatively larger bits as compared to 64MP), I’m inclined to postulate that the narrow fines peak of 64MP is what causes us to grind finer, despite the fact that what led me to grinding finer in the first place was an assumption of these burrs generating more fines.
Let me explain – what I think might be happening (in a very pocketscience way) is that even though the boulder volume distributions for both burrs may seem similar, the cumulative way in which fines (or to be more specific, not just fines but particles less than 100 microns in diameter) end up migrating maybe responsible for a difference in drawdown times, and hence contact time between boulders and brew-water which in turn affects final extraction (and taste). Postulating a bit based on the fines migration section in the percolation chapter in Jonathan’s book “The Physics of Filter Coffee”, since larger particles in the sub-100 micron range can migrate easier than the smaller particles, my hunch is it’s possible these are clogging up not just filter pores, but also the space between the boulders. Smaller particles on the other hand, even though they migrate, in the first place maybe potentially migrating in lesser amounts than the larger particles and the amount of such small particles that need to cause equivalent clogging may need to be a higher number volumetrically.


A lot of folks assumed this intuitively (I wasn’t one of them till now), but the plots seem to indicate that fines (and sub-100 micron) migration affect extraction less in terms of solubles but rather how they inadvertently affect contact time and therefore extraction. This may help explain why I had to grind significantly finer to get appropriate contact time that gave me an acceptable taste profile at an efficient EY value. What I’m still a bit perplexed about is why increased ratio didn’t work quite as well to get me to that EY point. My speculation would be that the fines distribution didn’t create clogging to an extent that would allow enough contact time per unit volume of water that percolated with the coarse-grind particles to enable solubles to diffuse out efficiently, despite increased solvent gradient.
But that’s not what you said bro
You will have noticed that I ended up with quite a different theoretical understanding of what phenomena caused the behavior I was observing with 64MP burrs, than the assumptions that led me to better results in the first place. And that’s fortunately or unfortunately how a lot of coffee brewing is. We find good results based on a rudimentary understanding of phenomena, get unlucky by making a change in a certain direction, and then get lucky by making a change in the opposite direction. We understand very little despite potentially knowing a lot, and open-mindedness and skepticism are both warranted in this new era of grinders and burrs.
All of this being said and done, the Frankenjolly has been a joy to both look at and operate each time I head to the coffee table to pull a shot. I’m frankly amazed that two tiny pieces of sharpened metal spinning in opposite directions can create such delicious drinks for my palette, and I hope that over time more cafes and professionals warm up to the idea of fast-flow-low-ratio-high-EY syrups and also short-ratio filter drinks.
How do you know you’re right?
I don’t. Here’s some possible sources of error when making these PSDs:
- The impossibility of declumping all fines from boulders
- Introduction of noise when post-processing scans of grounds
- Chaff being detected as particles and fines
- Palette preferences
- Yet to be repeated by others
- Me
If you’ve made it till here, consider supporting NOT me, but the hourly coffee worker by donating to GoFundBean
Subscribe to keep your pocket updated with coffee science

Leave a comment