
Note: This post is intended to serve as a somewhat generic reference for different ways to both fix and check alignment on flat burr grinders, but may not apply to all grinder designs.
If my Frankenjolly were just a filter grinder, this story would probably have ended at Part 1. But I got Franken first and foremost for its espresso capabilities. To be specific, espresso made from (potentially) low fines burrs like SSP 64mm Multipurpose (64MP) which means just a tiny bit of misalignment between burrs can cause both the distribution to get wider and less fines to be generated. While one may think that a wider distribution’s solubles should retain enough puck resistance over 15 seconds, 64MP seems to generate a narrow enough distribution that soluble loss seems to be faster than what needs to be sustained for reduced fines. The net effect of this was super-gushers – shots where I could barely build pressure above 2-3 bar at super-fine grind settings after I replaced the bearings, let alone induce a bloom and be left with enough puck resistance to generate pressure post-bloom. If you can’t tell, this made me extremely sad.
Does alignment matter?
I can see why majority of folks who make espresso may think alignment doesn’t matter. If you were doing any one of the following – using dark roasts, making espresso for milk drinks or using high fines burrs, it’s quite possible you may have been able to generate enough puck resistance inherently without having to worry about sustaining pressure for long durations. However once you start dealing with light roast coffees and more “unimodal” or relatively low-fines burrs, alignment becomes paramount.
Does aligned truly mean aligned?
There is another aspect to alignment for which there does not seem to be a clear cut answer – how exactly do you determine good alignment, let alone how exactly do you ensure it? There are different techniques that folks use to ensure desired levels of precision. The most popular and accessible one is the dry erase marker test, whose accessibility and popularity also make it the most prone to criticism. Some of the criticisms include:
- A 100% wipe may not mean good alignment
- Does not account for shifts in alignment caused by other grinder components (sources of deviation will vary from grinder to grinder)
- It’s futile trying to chase a full wipe because anything close to a 50% wipe should be good enough.
It’s the last one I have the most issue with. Some grinder designer/manufacturers allegedly propagate this last unsubstantiated claim as a fact even when their grinders cost upwards of USD 2500. In my experience, a marker test is a useful test but should not be used in isolation.
Another semi-popular way that folks check alignment is by using a micron precision dial indicator mounted in a way that it’s perfectly parallel to the rotor shaft. There’s a couple of aspects that might make this error prone. One is ensuring that it’s perfectly parallel to the rotor shaft. Next is that for all videos I have seen that show (off) how their burr moves within a certain tolerance, I have only ever seen it being done for the rotating burr, giving us no information whatsoever for the fixed burr (or its alignment against the rotating burr). Not to mention, micron precision dial indicators can be very expensive.
Another reasonable way that folks use is to insert feeler gauges between the burrs when they’re at chirp to check the spacing between burrs at different orientations by rotating the shaft and inserting feeler gauges. This way one can potentially tell not just alignment but also burr warp or axle wobble if the spacing between burrs increases and decreases twice by significant amounts as you rotate the burr. In my opinion this is a useful approach if used in conjunction with a marker test.
All this being said, what’s the guarantee that your burrs are aligned after you get a perfect wipe with your marker test, very little variance on your dial indicator and acceptable gaps between burrs at chirp with feeler gauges? The answer is there’s no guarantee but a fair probability that your starting point is good. A better question to ask is how well does your grinder retain alignment over prolonged periods of usage. And this is where it gets tricky.
Nothing lasts forever
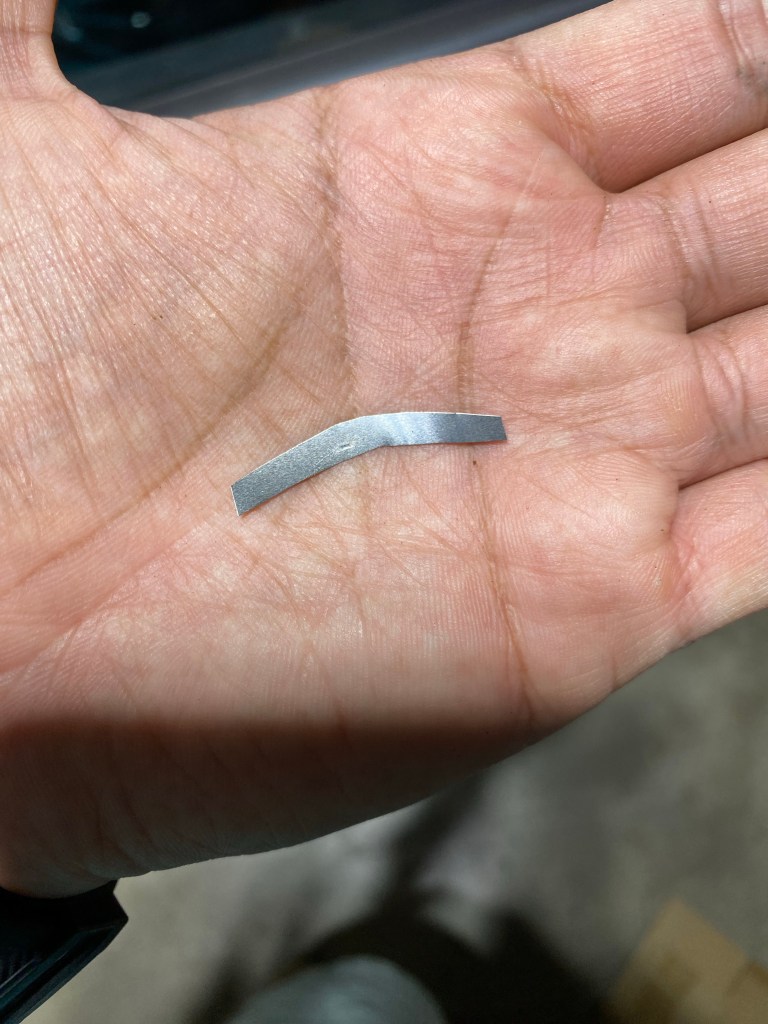
Being a grinder user and not manufacturer, there’s only a couple of ways I know of that allow one to address alignment. One is shimming and the other is sanding. We’ll discuss shimming first but before we get into that I want to set the basic criterion that I use to determine that my burrs need to be aligned better – if I see that my burrs are not being able to build sufficient puck resistance on my espresso machine for the coffees I prefer (usually pretty lightly roasted) and upon doing a dry erase marker test I see less than an 85% wipe for my grinder, do I consider it necessary to improve alignment. The first time both these criteria were met was when I had removed my existing burrs for a pair of SSP 64mm Cast V2 (CV2) burrs a fellow DE1 owner had kindly lent me to test out. Once I was done testing them and had put my 64MP burrs back, I decided to clean my lower burr carrier (an ordeal in itself on the Superjolly) by popping it out and putting it back on. While doing so, I was hesitant to put the lower carrier nut back on too tight in fear of damaging the carrier. In retrospect not tightening it enough was the wrong decision. The nut came loose and the lock washer was thin enough to get between the burrs and mangled by them. I had made an Instagram story a while ago detailing out the ordeal in case you’re interested. Needless to say this accident put enough force on the burrs and carriers to put them out of alignment.

Having heard of how easy it is to improve alignment by installing aluminium shims made from foil, that’s what I went for first. I was successful at both putting in shims to rectify wherever there was a lack of wipe with the marker test, and also at getting close to a 100% wipe. I want to mention here that I consider chirp the sharp sound burrs produce with the motor on but no beans and going finer till they just touch. I do not find determining chirp with the motor off very useful because that is less representative of burrs under the motor’s load. Feeling very happy, I ground the last coffee I was pulling shots of at a similar burr gap to check if it’s building enough resistance and to my horror, I still could not build enough pressure. I did the marker test and adjusted shims yet again based on wipe, only to become sad again upon pulling shots. If you think this is a good indication of the marker test being unreliable, let me ask you this – did you ever consider that aluminium shims might compress under forces produced by grinding and therefore not retain alignment? All the marker test is doing after all is indicating that alignment could not be retained.
Enter sandman
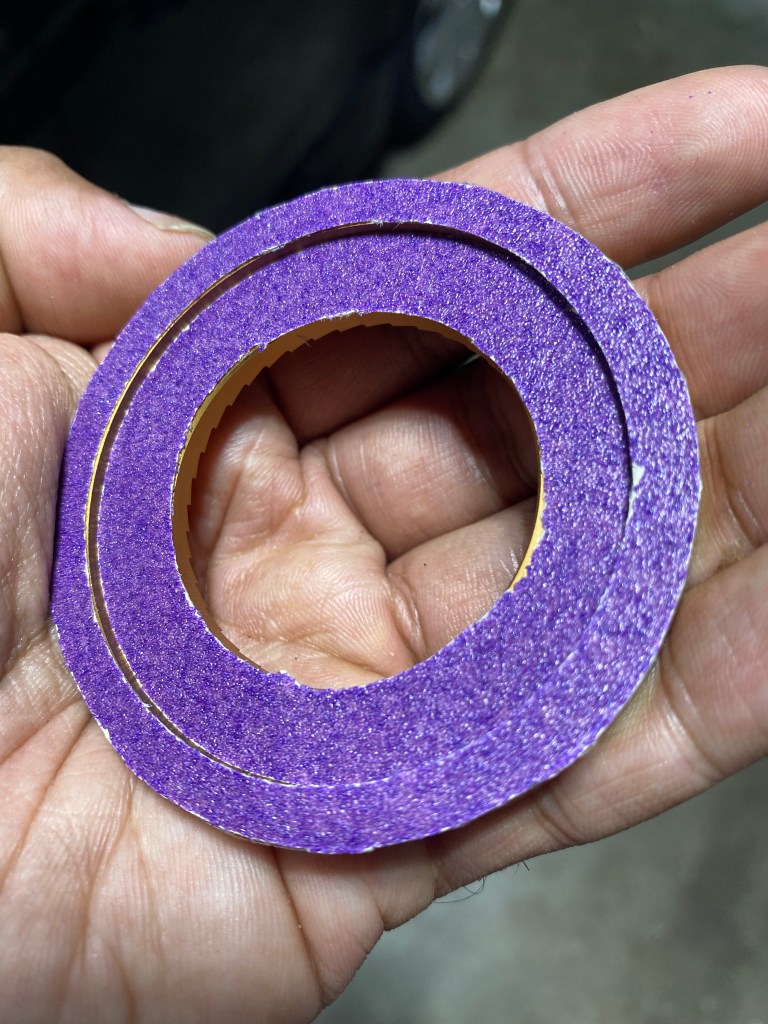
Several years ago Mitch Hale wrote about the benefits of using sandpaper for long-term burr alignment. If you have gone through the post above you might feel like the process is very intimidating. However there’s a few things to consider. The Superjolly’s lower carriers are mated to the burrs against their whole outer perimeter (unlike a DF64 where it sits on three poles created for screw holes). So in theory with enough sanding I should be able to get the surface to be a tight fit against the lower burr and when taped with the upper burr, it should result in a parallel orientation with the upper burr and by extension the upper carrier. So I did what any text-intimidated millennial would do and referred to this YouTube video on EK43 carrier sanding and adapted it for the Superjolly.
There’s a few things I did differently:
- I did not go through 6 rounds of sanding, only about two.
- I did not use “several” grits of sandpaper, only 150 and 320 grit.
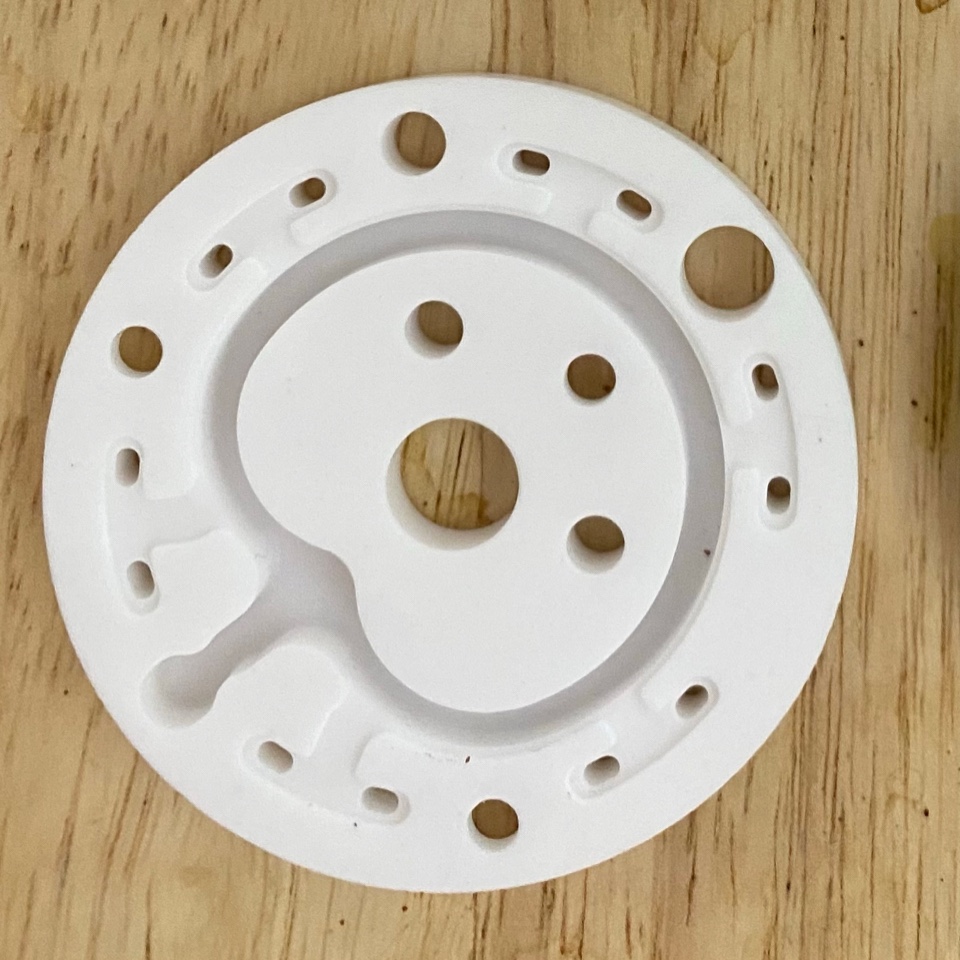
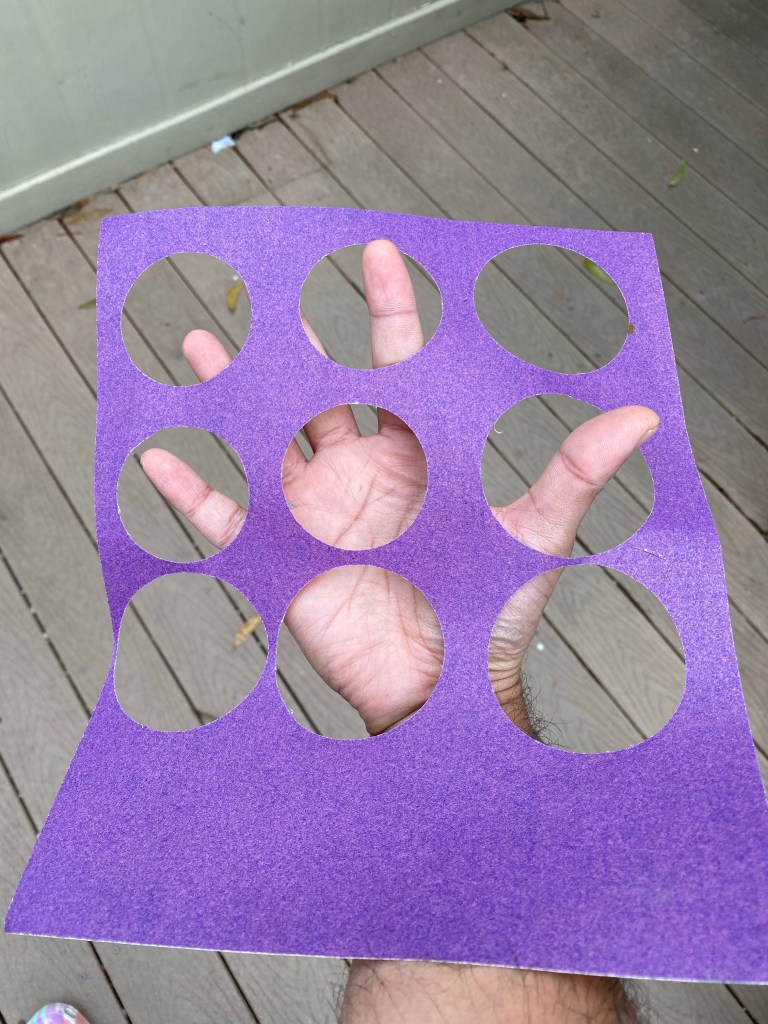
- I only cut out sections for the exact surfaces that mate (so a concentric cutout with an outer diameter of 64mm and inner diameter of 60mm), just like in the cover photo of this post
- I used double-sided tape to make the burrs stick together because I did not want the hassle of having to use a glue remover (have you used those things? Have you used it under extreme amounts of stress and anxiety when the last thing you want to do is to sit cleaning glue and instead spend the energy to quickly reattach the burrs and check alignment and sand again if needed?)
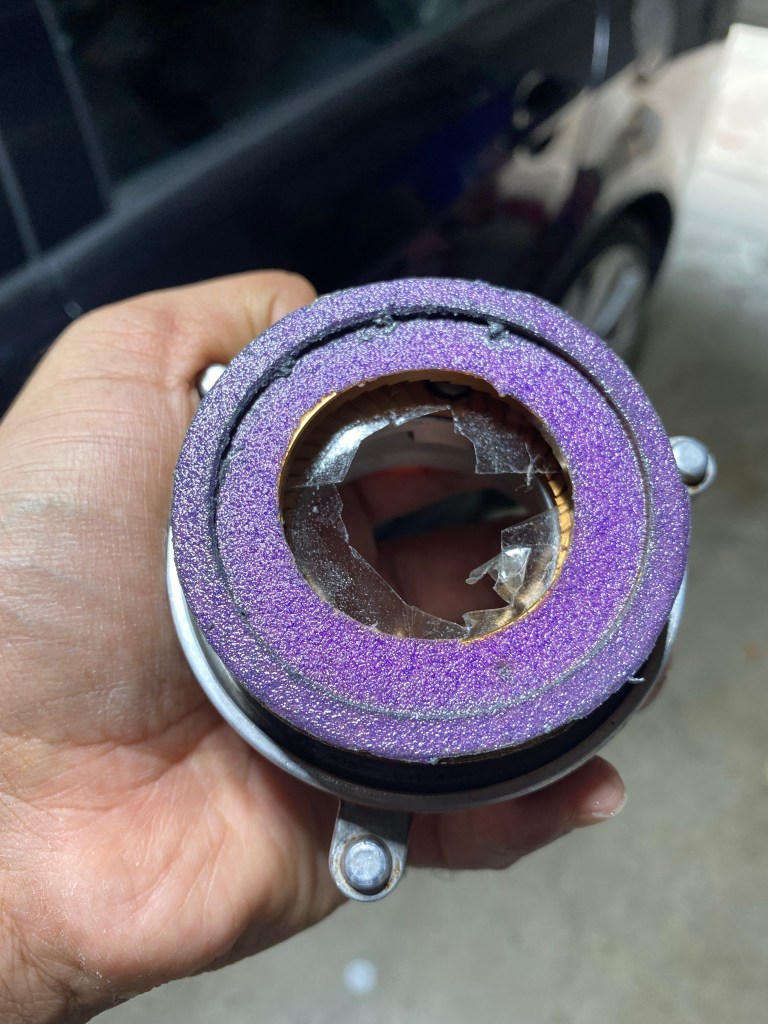
- I used an impact driver fitted with an appropriate wrench socket at very low speed to spin the shaft and sand the carrier. An impact driver is significantly lighter than a drill and imo every household should have one if a cheap one is available for purchase where they live (it’s useful for many things around the house).
And this did the trick, or at least it was sufficient for the nut-coming-loose incident. I got a burr wipe of about 90%, at which point I decided to pause sanding, do a taste and puck resistance test before deciding that whatever alignment I had was sufficient and that it holds for a period of sustained usage. This however was just the first time I would sand it. Replacing the bearings involves several steps that can affect alignment:
- Removing the lower carrier
- Removing the rotor shaft
- Reinstalling new bearings (this one probably has the most effect)

So I was not surprised that post bearing replacement when I did the marker test, the wipe was abysmal (below 40%). Which also meant going through the sanding process again. Although this time I was not as nervous, I was wanting to sand both carriers and that too with just 150 grit paper. My thinking was that this level of coarseness should be capable of removing sufficient amounts of metal with say two minutes of sanding with the impact driver at low rpms without the coarseness being so high that the surface gets grainy, while also getting me close enough to my desired alignment, and any remaining amount can be achieved by finer grit sizes like 320.
However this time despite sanding both the upper and lower carriers twice with 150 grit paper, I was not able to build enough puck resistance. To be kind towards my own mental health I decided to take a break from the process. That’s when I vaguely remembered Nate Walck (also coincidentally the previous owner of Frankenjolly) mention on Hedrickcord (Lance Hedrick’s discord) that one should consider using stainless steel shims for alignment as opposed to aluminium foil (Long Vo probably was the first to suggest this as a solution on EAF but in context of a different discussion).
But you said no shims
After chatting a bit with Nate about stainless steel shims, I ordered a set each of 50, 20 and 10 microns thickness, thinking that if indeed these yield and sustain good alignment, I should try and get them as precise as possible. Based on the lack of puck resistance post-sanding I took it for granted that the extent of misalignment might be closer to a hundred microns, seeing as I was only getting half the perimeter worth marker wipe. The best way to check would be to create stacks of 50 microns till the wipe changed sides, i.e., I have increased the height of one side so high that now the other side is missing a marker wipe as opposed to where I placed shims. What took me by surprise was I reached this juncture with just one 50 micron shim. Which in turn meant that my overall assumed misalignment wasn’t going to be worse than 50 microns.
I then implemented the same idea for 20 micron shims, figuring that stacking two should get me pretty close to an acceptable level of alignment. I should pause here to talk a bit about another way to anecdotally determine how well one’s burrs are aligned. What I noticed when hearing burr chirp first after bearing replacement, then after sanding the lower carrier, then the upper carrier and then each 20 micron shim, is that the sound of chirp progressively changed. Right after bearing replacement (highest misalignment) the chirp was a shrill sound gradually increasing in intensity till it became a “shriek”. After each of the stages listed above, the duration for which it was shrill before it shrieked kept getting shorter, when finally after the first twenty micron shim and then the second, the chirp was just a sharp shriek. I must confess that despite being an utterly nasty sound it was one of the best sounds I’d ever heard in my life.
Upon stacking two 20 micron shims, my burr wipe was now 85%, so I decided this was a good juncture to test puck resistance. In 2022 my sanity check for puck resistance was a frozen dose of delicious lightly roasted lacto-fermented castillo from José Jadir Losada in El Mirador, Suaza, Colombia (roasted by Christopher Feran), that needed a pretty fine grind to generate sufficient puck resistance for a tasty shot. The resulting shot was as perfect as it could get for that coffee in every sense by my standards. You can find more details about the shot here.
So do we shim or sand?
A while ago I would have said that sanding is the gold standard to fix alignment (assuming no component other than burrs and carriers are out of whack). But I have now come to believe that stainless steel shims, if accessible and affordable, can provide a lot more flexibility than just sanding. Think of them as individually good solutions for different setups. If you’re confident that you won’t be changing burrs on your grinder for ages, sanding is a cheap, efficient and robust option. If you’re gonna be swapping burrs (for example swapping between what seems like an endless list of 64mm burr options) then using stainless steel shims give a lot more flexibility, because remember, sanding only makes it good enough for a given burrset because even machined burr tolerances, however high, may not be able to achieve the precision needed for espresso. After having gone through all this I’m confident enough to say that aluminium foils as shims are very much pointless and in most cases will probably not retain alignment after one round of marker check, i.e., false positive.
Are they still aligned
I’m happy to say that after months of (home-barista) usage as of writing this post, the grinder is functioning as expected. I didn’t push for the last 5-10 microns because I think that falls in the diminishing returns category. I hope that I have been able to convey that the experience of aligning a grinder does not have to be nerve-wracking and anxiety filled, and that there are taste benefits in pursuing it, especially in espresso realm.
TL;DR
- Replacing bearings in a Superjolly necessitated improving alignment
- Alignment is desirable for light roast espresso with low fines burrs
- Sanding does not need to be an activity that takes hours. Half to one hour of targeted effort can be sufficient.
- Sanding is more approachable than it initially seems
- Stainless steel shims are a good alternative to sanding provided the extent of misalignment isn’t huge.
- Once can use a combination of sanding and stainless steel shims depending on use case.
- Aluminium shims can be a waste of effort and misrepresent alignment.
Acknowledgements
- Nate Walck for proposing stainless steel shims
If you’ve made it till here, consider supporting NOT me, but the hourly coffee worker by donating to GoFundBean
Subscribe to keep your pocket updated with coffee science

Leave a comment